7 Steps to Make a Dinosaur Valentine Box Everyone Will Adore
Create a dinosaur Valentine box with seven simple steps: choose a box, prepare materials, wrap with paper, add dinosaur details, create a mouth slot, personalize, and finish with varnish for durability. This charming crafting project is perfect for Valentine’s Day.
Crafting a dinosaur Valentine box can be both fun and straightforward. Start by unleashing your creativity and stirring excitement for the season of love with an adorable prehistoric twist.
Children and adults alike will be delighted to exchange valentines using a hand-decorated box that stands out.
Read on to discover how to transform a simple container into a lovable dinosaur that will capture hearts.
This guide will walk you through each step, ensuring you can create a delightful and durable Valentine box that’s bound to be the envy of any classroom or office.
With minimal materials and a bit of imagination, you’re just steps away from crafting a dino-mite Valentine’s keepsake!

The Roar Of Creativity: A Dinosaur Valentine Box
Unleash your inner artist with The Roar of Creativity: A Dinosaur Valentine Box.
This crafty project combines the excitement of dinosaurs with the spirit of Valentine’s Day.
Create a prehistoric treasure that will capture hearts and stand out in a sea of ordinary boxes.
Why Dinosaurs Captivate The Heart
Dinosaurs stir up adventure and mystery in everyone’s heart.
Their grandeur and ancient allure create a perfect theme for a Valentine box that’s both unique and enchanting.
Friends and classmates will be thrilled to drop Valentines into a box that roars with prehistoric fun.
Essential Materials For Your Prehistoric Creation
Here’s what you need to begin:
- Cardboard box – A sturdy base for your creation.
- Construction paper – In greens, browns, and reds for that dino vibe.
- Glue and scissors – To stick your materials and shape your design.
- Paints and brushes – For colorful backdrops and details.
- Markers – To add texture and fine lines.
- Dinosaur toys – For a 3D effect that pops.
- Extras: Googly eyes, glitter, stickers – For the fun finishing touches.

Credit: ideas.hallmark.com
Step 1: Hatching The Idea
Crafting a Dinosaur Valentine Box brings excitement to any Valentine’s Day. Start with Step 1: Hatching the Idea.
Sketching Your Dinosaur Design
A unique box begins with a vivid sketch. Grab paper and pencils. Imagine a friendly T-Rex or a flying Pterodactyl. Think big teeth, scales, and a long tail. Draw your dinosaur from different angles.
Include features like a mouth slot for cards. Add fun details: spikes, wings, or even a heart-shaped crest. Your sketch will guide your creation.
Choosing A Color Scheme That Stands Out
Colors bring your dino to life. Select a palette that catches the eye and warms the heart. Consider bright greens, vibrant reds, or playful purples. Think about Valentine’s colors: various pinks and reds.
- Bright greens for a classic dino look.
- Vibrant reds spread the love.
- Mix in whites or yellows for contrast.
Select two main colors and an accent color. This palette will give your box character and charm.
Step 2: Building The Foundation
The second step is all about creating a strong base for your dinosaur Valentine box. Think of this as the skeleton of your dinosaur. It needs to be sturdy.
It should hold all the Valentine’s Day cards securely. Let’s dive into cutting and assembling the base shapes that will form your dino box.
Cutting The Base Shapes
Gather your cardboard or heavy cardstock. You will need a big piece. This will become the bottom of your box. You’ll cut two shapes from this. One is large and rectangular.
The other is in the shape of your chosen dinosaur. Use a sharp pair of scissors or a craft knife. Make sure an adult is around to help with this part.
- Trace out the rectangle – This will be the box’s bottom.
- Draw your dinosaur shape – Use a template or freehand it.
- Cut the shapes out – Safety first, so take your time.
Assembling The Box Structure
Now it’s time to bring your dinosaur to life. Start with the rectangular base. Attach the dinosaur shape to this base using glue or tape. Make sure it stands up straight. This will form the back of your Valentine box.
- Align the base and back – Ensure they are even.
- Apply adhesive – Use a glue stick or double-sided tape.
- Press firmly – Secure the two pieces together.
Your dino Valentine box is starting to take shape. Remember to let the glue dry completely. This ensures everything stays in place. Do not rush this step!
| Material | Quantity | Notes |
|---|---|---|
| Cardboard or Cardstock | 1 Large Piece | Should be sturdy |
| Scissors or Craft Knife | 1 | Use with adult supervision |
| Glue or Tape | 1 | Double-sided tape works well |
Keep your workspace tidy. Collect all scrap pieces. These can be used for additional features later on.
Step 3: Scales And Tails
Add personality and fun to your Dinosaur Valentine Box with eye-catching scales and a swishy tail! This step brings your dino to life and makes your box stand out. Let’s dive into creating these awesome features with ease and creativity.
Crafting The Dino Features
Every dinosaur needs its iconic scales and we’ve got some simple yet effective methods to craft them:
- Cut out shapes from colored paper or foam sheets.
- Choose different sizes for variety.
- Stick with theme colors or mix it up for fun.
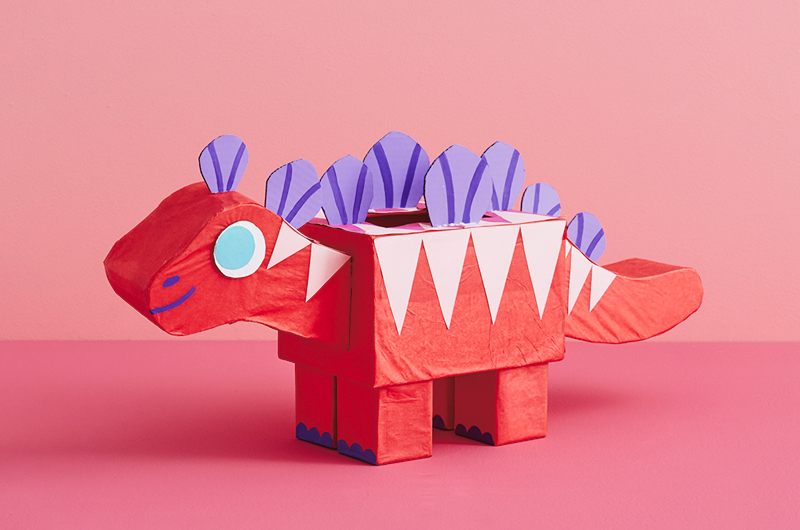
For the scales, geometric shapes like triangles or diamonds work great. They easily represent dino scales. For a more 3D effect, fold them in half and attach only the bottom part to the box, making them stand out.
Attaching The Tail And Spine
The tail and spine are what give your dinosaur its characteristic silhouette. To attach these elements:
- Construct the tail from cardstock or felt, making sure it’s sturdy.
- Shape it long and pointed at the end for that classic dino look.
- For the spine, use similar shapes to the scales but larger and attach them along the tail.
Secure the tail to the back of the box with strong tape or glue. The spine should run from the top of the head down to the end of the tail. Make sure all parts are firmly attached to withstand the excitement of Valentine’s Day!
Step 4: A Ferocious Face
Finding the perfect roar for your dinosaur Valentine box is next. Remember, the face is the first thing everyone sees. It’s time to add some prehistoric character to your creation with
Making The Eyes And Teeth
Crafting dinosaur eyes and sharp teeth brings the box to life. Gather your materials and follow these simple steps:
- For eyes: Use large googly eyes or cut circles out of white and black paper.
- For teeth: Cut triangular shapes from white cardstock for that fierce dinosaur smile.
Glue the eyes onto the box, making sure they’re staring forward. Space the teeth evenly along the edge where the box opens to reveal the dinosaur’s powerful bite!
Adding The Snout And Ears
The snout and ears shape your dino’s personality. Here’s how to add them:
- Snout: Cut a smaller box or craft foam to create a snout. Attach it with glue just below the eyes.
- Ears: Use felt or cardstock cut into semi-circles. Fix them just above the box’s opening, on each side of the face.
With every piece, your dinosaur Valentine box is coming to life. Adjust the features to match your dino’s character – be it friendly or fierce!
Step 5: Prehistoric Paintwork
Step 5: Prehistoric Paintwork brings life to your dinosaur Valentine box. This step is a thrilling adventure. Transform simple cardboard into a vibrant, prehistoric creature.
Your paints and brushes will act as your time machine back to the age of the dinosaurs. Follow these guides for a show-stopping finish that will capture hearts.
Selecting Your Paints And Brushes
Choosing the right tools is key for your dinosaur to make a statement. Consider these factors:
- Acrylic paints give a durable, vibrant look.
- Watercolors blend easily for a soft, prehistoric ambiance.
- Brushes come in many sizes. Use wider brushes for broad swathes of color and finer brushes for details.
- Don’t forget a mixing palette and a cup of water to clean your brushes.
Techniques For A Realistic Finish
Craft a dinosaur with authentic charm. These techniques will help:
- Dabbing: Use a sponge to dab on paint. This creates realistic skin textures.
- Layering: Start with lighter colors. Gradually add darker layers.
- Dry brushing: Wipe most paint off the brush. Lightly drag over raised areas for highlights.
To make scales, use the back of a paintbrush to etch into wet paint.
Experiment with different methods. Your dinosaur will be the talk of the town!
Step 6: Love Bites And Valentine Slots
It’s time to ensure your Dinosaur Valentine Box is ready to receive those sweet messages! Craft a slot for cards to drop into and add love-themed decorations for that perfect prehistoric touch.
Creating A Slot For Valentine Cards
First things first: your dinosaur needs a mouth to collect valentines, right? Follow these steps to make the slot:
- Choose the spot on your box that looks like a good mouth.
- Draw a line with a pencil to mark where the slot will be.
- Use a craft knife (parents’ job) to cut along the line.
- Sand the edges gently so no paper cuts happen.
Tip: Make sure the slot is wide enough for cards to fit through easily.
Decorative Elements For The Love Theme
Now, let’s decorate with some love! Here are fun ideas to make your box adorable:
- Heart stickers: A dino’s skin can sparkle with hearts.
- Red and pink paper: Cut out heart shapes and glue them on.
- Glitter: Add a bit of sparkle here and there.
- Love messages: Write cute sayings like “You’re Dino-mite!”
Remember: Mixing different sizes and colors makes it visually exciting! Your box is almost ready to be the star of Valentine’s Day. Now onto the final touches!
Step 7: The Final Roar
As we approach the final touches of our Dinosaur Valentine Box, the anticipation builds. Like a dinosaur’s mighty roar, our creation will soon echo admiration from all who gaze upon it.
Let’s ensure our Valentine’s masterpiece stands tall and proud – a treasure trove of prehistoric love that captures both hearts and imaginations.
Assessing And Touching Up
Take a step back and behold your craft. Your dinosaur Valentine box now needs that keen eye for detail. Carefully inspect from every angle.
Look for spots that need extra glue, paint touch-ups, or maybe an additional heart sticker to spread more love.
Use bright colors to highlight edges or sharpies to outline those fearsome teeth. Ensure your dinosaur is flawless, ready for the grand occasion!
- Check for loose edges and secure them.
- Add glitter for a sparkling touch.
- Highlight features with a marker for definition.
Showcasing Your Dino Valentine Box
The spotlight is now on your dinosaur Valentine box. Choose a perfect spot to display it. A high, clear surface or the center of the valentines’ exchange area ensures maximum visibility.
Make sure it’s accessible for everyone to drop their valentines in. With vibrant colors and an inviting design, your box should beckon classmates like a dino beacon of love. Go ahead, place your Dino Valentine box on the pedestal it deserves!
- Position your box where it stands out.
- Check for good lighting to enhance its features.
- Ensure easy access for valentine deposits.
Unleashing The Beast: Display And Reception
Unleashing the Beast: Display and Reception – the moment has arrived to showcase your labor of love.
A dinosaur Valentine box, brimming with creativity, waits to claim its spotlight amongst a sea of cookie-cutter boxes. It’s time to reveal this jurassic gem to an audience of eager peers.
Their eyes wide with anticipation, they’re ready to be wowed by your prehistoric prowess.
Tips For Presenting Your Box
- Find the Perfect Spot: Choose a central location where your dino box can stand proud.
- Visibility is Key: Make sure every angle is visible for all to admire.
- Accent Lighting: Use soft lighting to highlight your box’s best features.
- Secure the Box: Ensure it won’t tip over when valentines are dropped in.
Capturing The Joy Of Classmates And Friends
Capture the smiles and excitement as classmates feed your dinosaur their valentines.
- Have a camera ready to snap pictures of their reactions.
- Encourage everyone to see how the box “chomps” their cards.
- Create a hashtag for sharing the fun on social media.
- Keep a guestbook nearby for friends to pen their thoughts.
Frequently Asked Questions On 7 Steps To Make A Dinosaur Valentine Box Everyone Will Adore
How To Make A Dinosaur Valentines Day Box?
To create a dinosaur Valentine’s Day box:
1. Gather a shoebox, construction paper, scissors, glue, and markers.
2. Wrap the box in green paper.
3. Cut out dinosaur shapes and heart stickers.
4. Decorate the box with these cutouts.
5. Add a slot for Valentine’s cards.
How To Make Easy Valentine Boxes?
Choose a shoebox for your base and wrap it in Valentine-themed paper. Cut a slot in the box top for card insertion. Decorate with stickers, ribbons, and glitter. Personalize with a name tag or heartfelt message. Keep designs simple and fun for easy crafting.
How Do You Make A Dinosaur Out Of A Shoe Box?
To make a dinosaur from a shoebox, first cut and shape the box into a dinosaur body. Use additional cardboard for legs, head, and tail. Secure the pieces with tape or glue. Finally, decorate with paint or markers for a finished look.
How To Make A Dinosaur Out Of Cardboard Boxes?
Select various sized boxes for the dinosaur body, head, tail, and limbs. Cut and tape the boxes into shape, then cover with paper or paint. Add details like eyes and teeth for authenticity.
Conclusion
Creating your dinosaur Valentine box can be a blast of prehistoric proportions! By following the seven easy steps outlined above, you’ll craft a box that stands out in a sea of plain designs. Don’t forget: personal touches make it truly special.
Get ready for a roaring Valentine’s Day filled with admiring glances and heartfelt exchanges. Happy crafting!


